Skip to content

New blog just for RuGUI!

Today, I’ve setup this new blog for RuGUI. All posts that we’re in the Intelitiva’s blog were imported into this new blog.

This blog is the official RuGUI blog from now on. There is still some work to do in the blog, specially its appearence, hope to change it soon.

Cheers :)

Tagged , ,

RuGUI repository and Issue Tracker changed

We’ve decided to move the RuGUI repository in GitHub to its own account. Also we’ve decide to use the built-in GitHub Issue Tracker in order to simplify and centralize issue tracking for RuGUI.

Since RuGUI is an open source and free framework we wanted to give it its own space, completely independent of us here at Intelitiva. We think that this change will help RuGUI users and commiters to feel more confortable when contributing to RuGUI.

Cheers

Tagged , ,

Be a Developer, not a Programmer!

In the past days I’ve been thinking about those two words: Developer and Programmer. Wikipedia says that a Programmer is someone who writes computer software, while a Developer is someone concerned with the developement process, somenone who architects the software, on a higher level.

Well, for me, the difference is more simple. What is a program anyway? It is a sequence of steps that should be followed to achieve a pre-defined goal, or to solve a specific problem. When you run a program it will always have the same behavior, in other words, it will do the same thing again and again and again. And what about Development? Development is the process of getting an initial idea and elaborate it, evolve it, so that it reaches its goal, in other words, solve the problem.

A programmer is someone who writes programs. A developer is someone who develops an idea, or a solution. This is an iterative process. First there is the idea (or solution), then you improve it, and you ask: “Is it good?”. The answer: “No”. So you improve it again, and repeat the question on and on until you are satisfied.

“When You’re A Hammer Everything Looks Like A Nail”. A very famous saying. But what does it has to do with Developers VS Programmers thing? Well, when all you see are problems, you tend to look (and fix) problems. Likewise, when all you see are solutions, you tend to look (and think) about solutions.

A developer should always think about the solution. The problem is there, he realizes it, he knows that. There is nothing he can do to change the problem. But he can, and will, find a solution for that problem. Focusing on finding the solution, he will often ask himself: “Is it a good solution? Can I improve it? Should I spend more time on it?”. Programmers, on the other hand, are easy to please. If they can solve a problem with 10 lines of bad code, why should they care if there is a solution that solves it using 5 lines of good, clear and simpler code? If they can write a single and huge method, why should they split it? Just because someone may want to use some of that functionality later? Bah…

Does it look good? Definitly NO!

Is not that every code you write is bad, but if you, the one person that has written it, do not have the nerve to judge it, who will? Maybe you could refator some method, or change the order in which you check for conditions in an if. Maybe you will just end up liking your code the way it is, and won’t change it at all. Nevertheless, you need to judge your code. If it is not good for you, then it ain’t good at all.

One of the greatest things about Ruby is its philosofy. Unlike other languages Ruby doesn’t oblige you to solve a problem with a single solution. For example, how can you get the size of an array? [].size. But you could also get its length [].length, or count how many items with [].count (for Ruby>1.8.7). For each context there is a solution that may be better than another. There is no single way to do it. There is the way that it is best for you. The one you like the most. And this could be applied to any language, not only Ruby. Ruby only makes this easier by given these options in its core.

The most important thing to learn here is that code is less written than it is read. You will write your code once, but it will be read many times, by many people. Thus when you write some code you should always put yourself in the place of those who will read it later. If the code is not clear, than you should make it clear. Don’t just go adding some crazy documentation trying to explain the mess you’ve just made. Try to improve the code, refactor it, split it into multiple smaller methods, give a better name for the method or variable. You will get a good, clean, easy to read, running code, and, who knows, you may even reuse some of those smaller methods later.

Just think about it, you want to be a programmer, somenone who just repeats tasks, creating code that no one understands, solving bugs that were already solved, copying and pasting code everywhere trying to make it work? Or do you want to make code that will last, not because it is mythical, but because it’s good? Do you want to take a list of tasks you should do, and just do them, like a machine? Shouldn’t you discuss it, share your ideas, improve the solution?

Be a developer, not a programmer!

Tagged , ,

Getting your feet wet with RuGUI

If you have already read this article you may wonder: “Ok, I can do a Hello World application with some new framework, so now what?”.

“Hello World” applications are not usually very good examples of real world applications, they are just there to get you started. However no one would ever write a tutorial using a real (and I mean REAL) world application. What would be the better example to demonstrate the possibilities of a given framework is an endless debate.

For this tutorial I chose to build a simple calculator. Simple because it will not have many of the features other calculators have. Simple because it should be easy to write, and of course, because it should fit this tutorial. However it should also have enough features so that it could show most of the RuGUI features.

RuGUI has evolved a little bit since I’ve written the first tutorial, for example, now we could have chosen to write this application using the Qt framework. For now we will stay with the Gtk framework, later I will translate this tutorial for Qt users.

The full application source code can be downloaded here

Talking about MVC

First, let me explain how the MVC pattern is used in RuGUI. RuGUI was initially inspired by the pygtkmvc framework. Some of the features that come with RuGUI, like the Observer pattern, implementation were inspired by pygtkmvc.

The idea behind using the observer pattern for model->controller interactions is great, so why didn’t we just use that framework? Well, it had some limitations at that time. You could have only one model, one view and one controller. I’ve seen that this has changed, and now you can have a different design for your controllers/views/models. Still, we were using ruby for our web applications and we wanted to continue to use it for the desktop applications.

RuGUI lets you design your controllers/views/models in any way you want. The principles are maintained, a model can be observed by controllers, and a controller may control any number of views, but also other controllers. The only “limitation” is that you may only have one MainController, but well, how could you have more than one?

Enought of this talk, lets code something!

First, lets generate the application, go to your projects directory and type:

  rugui simple_calculator

If you run the application (rake run or ./bin/simple_calculator) you will see the “Hello World” application.

Simple Calculator

We will stick with only one view for now, so it will have everything in it. It is pretty simple, a TextEntry above, to display the results. We could have used a Label, but the TextEntry is more powerful, and it is already styled for us. We just set it to not be editable, so that the users can only enter values using the buttons. We called it display; this will be used later to reference it in code.

Below the display, we have the input buttons. The numerical ones were called as num_x_button where x is the numerical value of the button. The operators were called xxx_operation where xxx is one of the available operations (sum, subtraction, division, multiplication). Finally, the backspace, equals, decimal separator, and clear buttons were called backspace_button, equals_button, decimal_button, and clear_button respectively.

A vertical layout and a table layout were used to pack the widgets together. Notice that we will not set signal handlers in glade.

Ok, the view is ready (at least the glade file), so lets go to the model. What do we need?

  • We need to keep track of which numerical keys were pressed.
  • The decimal separator button could cause us some trouble…
  • We will only be performing simple operations, so that after a second operator is pressed it takes the result of the first operation as its first parameter
  • For example: The user presses 4, then +, then 7, then *. In this moment we should have performed the first operation (4 + 7).
  • We have a backspace button, which clears the last digit (only digits)
  • We have the clear button, which clears it all.

We could model this as a Calculator model class with these observable properties:

  • numerical_keys: An array with all the numerical keys and, possible a single decimal separator.
  • operand: Saves the last operand after one of the operators are clicked.
  • operation: Saves the last operator clicked.
  • result: Saves the result of the last operation.

We generate the model file:

  script/generate model Calculator

The observable properties in the Calculator class should look like this:

  observable_property :numerical_keys, :initial_value => []
  observable_property :o perand
  observable_property :o peration
  observable_property :result

But who is controlling it all?

Since this is a simple application the MainController itself will be controlling everything, ahem, I mean, almost everything. One of the main problems I usually find in MVC application is the misuse of the models as “inteligent beings”. See, if someone was to know how to calculate the result, for example, that would be the model. By using the model we simplify the implementation and also allow it to be tested separately.

Lets take a look at the controller implementation, step by step:

  def setup_views
    register_view :main_view
  end

  def setup_models
    register_model :calculator
  end

Here we register the MainView and the Calculator model, which we are going to use for this application.

  on :backspace_button, 'clicked' do
    self.calculator.backspace
  end

  on :clear_button, 'clicked' do
    self.calculator.clear
  end

  on :equals_button, 'clicked' do
    self.calculator.calculate_result
  end

Ahm??? Get it? Here we are actually telling that for any view which has a button named :backspace_button that is clicked, we want to do something. In this case we are calling a method in the model. We could have done it in the older way, by setting a method handler in glade and declaring it here, like so:

  def on_backspace_button_clicked(widget)
    self.calculator.backspace
  end

  def on_clear_button_clicked(widget)
    self.calculator.clear
  end

  def on_equals_button_clicked(widget)
    self.calculator.calculate_result
  end

However, there are some disadvantages in the latter wat. First you have to declare the method in a glade file and also in your code. Second, the method must contain all arguments needed for the handler, even if you don’t intend to use it. Finally, this would only work if you have created the widget in a glade file. For all these reasons the latter form is somewhat deprecated, it will still work, but you should prefer the first form.

  on :main_window, 'delete-event' do
    quit
  end

When the main_window is close we quit the application.

  (0..9).each do |numerical_key|
    on "num_#{numerical_key}_button", 'clicked' do |widget|
      key = widget.name.match(/num_(\d)_button/)[1]
      self.calculator.numerical_keys << key
    end
  end

  on :decimal_separator_button, 'clicked' do
    self.calculator.numerical_keys << '.' unless self.calculator.numerical_keys.include?('.')
  end

  %w(sum subtraction multiplication division).each do |operation|
    on "#{operation}_operation_button", 'clicked' do |widget|
      operation = widget.name.match(/([a-z]*)_operation_button/)[1]
      self.calculator.change_operation_to(operation)
    end
  end

Wew!!? What is this? Well, a little bit of meta-programming can do no harm, can it? I could have repeated this for each numerical key, but it just does not make any sense. Surely if I needed some performance I wouldn’t be doing this, but, hey this is a simple calculator! Let us use the power of Ruby language at our favor!

  def property_numerical_keys_changed(model, new_value, old_value)
    self.main_view.display.text = new_value.join
  end

  def property_result_changed(model, new_value, old_value)
    self.main_view.display.text = new_value.to_s
  end

Finally we are actually messing with the MainView. But, just two methods? Yes, you are right, there are just two methods that changes the view. One is called every time the numerical_keys property is changed, basically, whenever the user clicks on a key button, but it can also happen when calculating the result. The other is called after the result changes, i.e., after it is calculated.

Is there any logic in that?

Almost forgot it… Yep, here it is (in the Calculator model, of course):

  def change_operation_to(operation)
    if has_operand?
      calculate_result
    else
      save_operand
    end

    self.numerical_keys = []
    self.operation = operation
  end

  def has_operand?
    not self.operand.blank?
  end

  def save_operand
    self.operand = Calculator.to_operand(self.numerical_keys)
  end

The first method changes the current operation. If we have an operand, the we calculate the result, which will left us with only one operand, then we clear the numerical_keys and change the operation. If we don’t have an operand yet, we just save it, then clear the numerical_keys and change the operation. The save_operand method calls Calculator.to_operand(numerical_keys_array), which just joins the array (remember that the input keys are strings, not integers) and transform it to a float.

  def backspace
    self.numerical_keys.pop
  end

  def clear
    reset!
  end

These two are very simple, the first one just pops the last key from the numerical_keys property (it has no effect if the array is empty). The second calls a very useful (if used with extreme care) method of RuGUI::BaseModel, the reset! method. It will reset all observable properties of the model instance to their reset_value, which are, by default, equals to their initial_value.

  def calculate_result
    if self.numerical_keys.empty?
      # we don't have a second operand, so there is nothing to be calculated.
      self.result = self.operand
    elsif self.operand.blank?
      # no operand, nothing to do.
    else
      second_operand = Calculator.to_operand(self.numerical_keys)
      self.numerical_keys = []
      send(&amp;quot;calculate_#{self.operation}_result&amp;quot;, second_operand)
      self.operand = self.result
    end
  end

  def calculate_sum_result(second_operand)
    self.result = self.operand + second_operand
  end

  def calculate_subtraction_result(second_operand)
    self.result = self.operand - second_operand
  end

  def calculate_multiplication_result(second_operand)
    self.result = self.operand * second_operand
  end

  def calculate_division_result(second_operand)
    self.result = self.operand / second_operand
  end

Well this is the most complicated one. Here are the scenarios it is covering:

  • When we have no numerical_keys we just set the result equals to the operand. That enables us to let the users click in two operators sequentially to change the current operator.
  • When there is no operand there is nothing to calculate.
  • Otherwise we get the second operand, clear the numerical_keys (this will make the visor be cleared), then call the proper calculation method, given the current operation.

That’s it!

Try this awesome simple calculator now! We’ve made it with only a few lines of code (less than 200 for the model, view, controller). It is still missing some usability and, better displaying of operations, not to say that it is very limited, but it served well for this tutorial.

This tutorial was written using another RuGUI application: Markup Translator. It allows you to write in textile and see the HTML output on-the-fly side by side. It is still a work in progress, but feel free to check it out and explore its code!

Markup Translator

If you want to contribute for RuGUI, or if you have written an application using RuGUI, please let us know!

Tagged , , ,

Olá RuGUI! Desenvolvendo aplicações desktop utilizando Ruby/GTK

Este post é a tradução do post intitulado Hello RuGUI!

RuGUI

Então você quer começar a brincar com GTK e Ruby mas ainda não sabe por onde começar? Não tenha medo, estamos aqui para ajudá-lo. Existem muitos exemplos de programas “Olá, Mundo!” com Ruby/GTK. Bem, ambos Ruby e GTK são excelentes escolhas para a construção de aplicações desktop. Ruby é uma linguagem dinâmica com características incríveis como closures e, é claro, uma extensa biblioteca própria. GTK, por sua vez, é um framework amplamente utilizado, com muitas widgets úteis além de ter uma API ótima para impressão, exibição de vídeos, reprodução de áudio, etc. Combine esses dois elementos e você chega ao Ruby/GTK, um ótimo framework… uhmmm… framework?

Deixe-me perguntar algumas questões para você. Suponha que você esteja começando a escrever uma nova aplicação desktop em Ruby/GTK, uma que seja realmente grande, com muitos casos de uso e pequenos detalhes. Como você desenharia sua estrutura de diretórios? E se você quisesse personalizar o estilo de um botão, ou alterar a cor de fundo de um TextView? E se sua aplicação fosse um tipo de servidor, e você quisesse exibir uma mensagem toda vez que um usuário se conectasse? E se você quisesse alterar a mensagem na barra de status, além de adicionar um ícone para o cliente numa IconView?

É claro que tudo isso poderia ser feito manualmente por você… Ou você poderia utilizar o RuGUI, que lhe oferece:

  • Uma abordagem MVC para aplicações desktop
  • Uma estrutura de diretórios, pronta para uso, similar ao que se tem em aplicações Ruby on Rails
  • Uma maneira mais fácil de personalizar widgets do que em aplicações Ruby/GTK normais
  • ActiveSupport – bem, alguém poderia dizer que isso é um requerimento/dependência, mas eu penso nisso mais como uma funcionalidade extra, uma vez que você acaba tendo uma API ruby muito mais rica e útil com ActiveSupport :)

Vejamos ele em ação com um simples “Hello, World”:

Gerando o esqueleto da sua aplicação

O RuGUI já cria essa aplicação Hello World para nós. Na verdade este é o ponto de partida de cada aplicação que você virá a fazer com o RuGUI. Uma vez instalado com uma gem vá para um diretório de sua escolha e digite num terminal:

  rugui helloworld

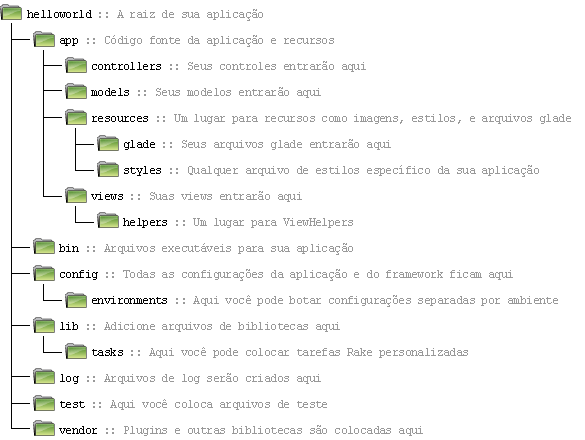
Isso irá gerar uma aplicação em {SEU_DIRETORIO}/helloworld. A estrutura de diretórios será assim:

Estrutura de Diretórios de uma Aplicação RuGUI

Para rodar a aplicação, entre no diretório helloworld e digite:

  ./bin/helloworld

Você poderia ter digitado também:

  rake run

Ou, se você precisar:

  ruby app/main.rb

A aplicação deve ser similar a isso:

Hello, World!

Se você clicar no botão, verá o texto acima sendo alterado. Como tudo isso funcionou?

Hello world passo a passo

Vamos analisar a aplicação passo a passo:

Quando você roda a aplicação, de qualquer forma (todas as três formas de iniciar a aplicação acabam por fazer a mesma coisa), o script app/main.rb é chamado. Aqui está o conteúdo desse arquivo:

#! /usr/bin/ruby

# You can run this application by running this file.
# Do not modify it, unless you know what you are doing.

require File.join(File.dirname(__FILE__), '..', 'config', 'environment')

main_controller = MainController.new
main_controller.run

Como você pode ver, a primeira coisa que fazemos é carregar o arquivo config/environment.rb. Isto irá inicializar a aplicação *RuGUI* com o ambiente padrão — development. Você poderia ter especificado um ambiente diferente configurando a variável de ambiente RUGUI_ENV. Esse procedimento de inicialização é muito similar ao procedimento de inicialização do Rails, ele foi basicamente copiado e adaptado.

Em seguida nós instanciamos o MainController e chamamos o método run. Simples, não?

Agora sobre o MainController. O quê que ele é mesmo? Ao contrário de aplicações web, todas as aplicações desktop possuem um conceito de loop principal. Basicamente, a aplicação é toda configurada antes de ser exibida. Ela então entra num loop infinito, que é responsável por exibir as widgets, disparar eventos conforme vão acontecendo (cliques em botões, apertos de teclas, tráfego de rede, operações de impressão, etc). Esses eventos podem alterar a aparência de widgets, os dados exibidos, ou qualquer outra coisa que você queira que seja feito.

Então o MainController do RuGUI é o ponto de partida real da programação de sua aplicação. Algo como a raiz de sua aplicação. Melhor ainda, todos os controles são filhos desse MainController, ou filhos de controles que são filhos do MainController. Isso está ficando complicado, mas com o tempo você irá entender.

Neste exemplo, nós temos apenas um controle, e ele é o MainController. Não criamos outro controle por simplicidade. Aqui está seu código:

class MainController < RuGUI::BaseMainController
  # Add your stuff here.

  def setup_views
    register_view :main_view
  end

  def on_main_window_delete_event(widget, event)
    quit
  end
end

Ele configura a view principal e adiciona um manipulador para o evento em que a janela principal é fechada, que é usado para fechar a aplicação. Este manipulador de eventos é configurado no arquivo main_view.glade. Todo controle pode observar eventos configurados por widgets em arquivos glade de todas as views registradas nele.

A view principal utiliza um arquivo glade para simplificar a criação e o posicionamento de widgets. Nós poderíamos ter criado as widgets manualmente, mas teriámos perdido muitas das funcionalidades como a conexão automática de manipuladores de eventos, além de ter de escrever muito mais código do que foi escrito:

class MainView < ApplicationView
  use_glade
  # Add your stuff here.

  def on_hello_button_clicked(widget)
    puts "Hello button clicked."
    self.message_label.text = "You clicked me!"
  end
end

Aqui nós colocamos um manipulador de evento para o clique do botão hello_button. Ele imprime uma mensagem no console, e altera o texto da widget message_label. Algumas notas aqui:

  • Todas as widgets criadas em arquivos glade possuem acessores de leitura para elas
  • Uma vez que estamos utilizando a nomeclatura e a estrutura de diretórios padrão não tivemos que especificar o arquivo glade para a view, mas poderíamos fazê-lo se quiséssemos. Ele foi meramente deduzido a partir do nome da classe (MainView => main_view).
  • A view também funciona como um observador para manipuladores de eventos de suas widgets. O manipulador do evento de clique de botão para o hello_button poderia ter sido declaro no controle, mas nós decidimos declará-lo aqui para mostrar isso.

Isso é basicamente tudo o que há!

Mas, peraí, eu consigo fazer isso em menos linhas!

É claro que sim, aqui está:

#! /usr/bin/ruby

require 'libglade2'

class MainViewGlade
  include GetText
  attr :glade

  def initialize(path_or_data, root = nil, domain = nil, localedir = nil, flag = GladeXML::FILE)
    bindtextdomain(domain, localedir, nil, "UTF-8")
    @glade = GladeXML.new(path_or_data, root, domain, localedir, flag) {|handler| method(handler)}
  end

  def on_main_window_delete_event(widget, arg0)
    Gtk.main_quit
  end

  def on_hello_button_clicked(widget)
    puts "Hello button clicked."
    @glade['message_label'].text = "You clicked me!"
  end
end

# Main program
if __FILE__ == $0
  # Set values as your own application.
  PROG_PATH = "main_view.glade"
  PROG_NAME = "Hello World!"
  MainViewGlade.new(PROG_PATH, nil, PROG_NAME)
  Gtk.main
end

No entanto, você muito provavelmente terá uma grande dor de cabeça quando precisar adicionar mais funcionalidades à aplicação. RuGUI procura te ajudar ao deixar você separar a sua aplicação em camadas bem definidas, cada uma com suas responsabilidades. Dessa forma fica muito mais fácil fazer com que sua aplicação evolua sem problemas na sua manutenção.

Está ficando animado? Comece a usá-lo agora mesmo!

Tagged , , ,

Hello RuGUI! Developing desktop applications using Ruby/GTK

You can check out a portuguese version of this post here

RuGUI

So you want to start out playing with GTK and Ruby but don’t know how to start? Fear not, we’re here to help you. There are a lot of examples of “Hello, World!” applications with Ruby/GTK. Well, both Ruby and GTK are great choices for building desktop applications. The first one is a dynamic language with amazing features like closures, and of course, with an extensive built-in library. The second one is a widely used GUI framework, with lots of helpful widgets and also a great library for printing, displaying videos, playing sounds, etc. Combine these two elements and you have Ruby/GTK, a great framework… uhmmm… framework?

Let me ask you a few questions. Suppose you’re starting a new desktop application in Ruby/GTK, a really big one, with lots of use cases and small details. How would you layout your directory structure? What if you needed to customize the style of a button, or change the background color of a TextView? What if your application is a kind of server, and you want some message displayed every time an user connects to it? What if you wanted to change the status bar message, and also add an icon for the client in an IconView?

Of course you could do this yourself… Or you could use RuGUI which gives you:

  • A MVC approach to desktop applications
  • A ready to use directory layout similar to what you’d see on a Ruby on Rails application
  • An easier way of customizing widgets than in normal Ruby/GTK applications
  • An implementation of the Observer pattern
  • ActiveSupport—hey, you could say that this is a requirement/dependency, but I think this is more like a feature since you’ll end up having a better ruby API with ActiveSupport :)

Let’s see it in action with a simple Hello World application.

Generating your application skeleton

RuGUI already creates this Hello World application for us. In fact this is the starting point for every application you’ll ever make with RuGUI. Once it is installed as a gem go to a directory of your choice and type in a terminal:

rugui helloworld

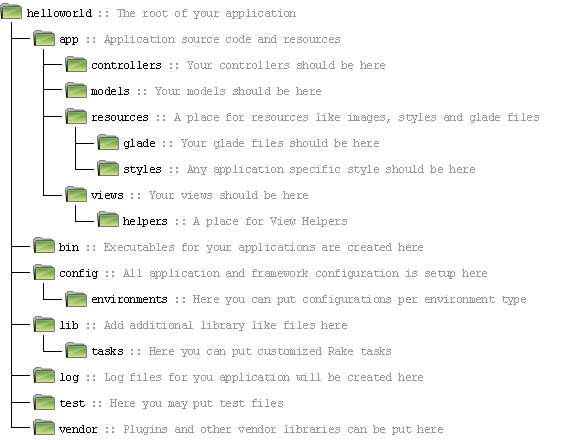
This will generate an application in {YOUR_DIRECTORY}/helloworld. The directory structure will be like this:

pastas_en

To run the application, enter the helloworld directory and type:

./bin/helloworld

You could also have typed:

rake run

Or even, if you must:

ruby app/main.rb

The application should look like this:

Hello World Application

If you click in the button you should see the top label changing. How did this all worked?

Hello World step by step

Let’s analyse the application step by step:

When you run the application, in any way (all three ways of starting the application end up doing the same thing), the app/main.rb script gets called. Here are the content of that file:

#! /usr/bin/ruby#

# You can run this application by running this file.
# Do not modify it, unless you know what you are doing.

require File.join(File.dirname(__FILE__), '..', 'config', 'environment')

main_controller = MainController.new
main_controller.run

As you can see, the first thing we do is to load the config/environment.rb file. This will initialize the RuGUI application with the default environment—development. You could’ve specified a different environment by setting the RUGUI_ENV environment variable. This initialization process is very similar to the Rails initialization process, it was mainly copied and adapted from it.

Next we instantiate the MainController and call its method run. Simple isn’t?

Now to the MainController. What is it again? Unlike web applications, all desktop applications have a concept of a main loop. Basically, the application is set up before it is actually displayed. It then enters an infinite loop, which is responsible for displaying widgets and firing events as they happen (button clicks, keys pressed, network data, printing operations, etc). These events may alter the widgets visual, change data, or any other thing you might want them to do.

So RuGUI’s MainController is the actual programming starting point of your application. Something like the root of your application. Better yet, all other controllers are children of this MainController, or children of controllers which are themselves children of this MainController. This is getting a little complicated, but in time you will get it.

In this example we only have one controller, and it is the MainController. We didn’t create another controller for simplicity. Here is its code:

class MainController < RuGUI::BaseMainController
  # Add your stuff here.

  def setup_views
    register_view :main_view
  end

  def on_main_window_delete_event(widget, event)
    quit
  end
end

It set up the main view and add a handler for the main window delete event, which is used to quit the application. This event handler is configured in the main_view.glade file. Every controller can observe events configured for widgets in glade files of all views registered for it.

The main view uses glade file to simplify the creation an positioning of widgets. We could’ve created the widgets by hand, but we would’ve lost many features like the automatic connection of event handlers, and we would have to write a lot more code than we did:

class MainView < ApplicationView
  use_glade
  # Add your stuff here.

  def on_hello_button_clicked(widget)
    puts "Hello button clicked."
    self.message_label.text = "You clicked me!"
  end
end

Here we’ve put an event handler for the clicked event of the hello_button widget. It prints a message in the console and change the text of the message_label widget. A few notes here:

  • All named widgets created in glade files have read accessors for them.
  • Since we are using default naming and directory conventions we didn’t need to specify the builder file for the view, but we could have done it if we wanted. It was merely deducted from the class name (MainView => main_view)
  • The view itself is also an observer for event handlers of its widgets. The clicked event handler for the hello_button could have been declared in the controller, but we’ve decided to declare it here to show this.

This is basically all there is to it!

But hey, I can do this with fewer lines!

Of course you can, here it is:

#! /usr/bin/ruby

require 'libglade2'

class MainViewGlade
  include GetText
  attr :glade

  def initialize(path_or_data, root = nil, domain = nil, localedir = nil, flag = GladeXML::FILE)
    bindtextdomain(domain, localedir, nil, "UTF-8")
    @glade = GladeXML.new(path_or_data, root, domain, localedir, flag) {|handler| method(handler)}
  end

  def on_main_window_delete_event(widget, arg0)
    Gtk.main_quit
  end

  def on_hello_button_clicked(widget)
    puts "Hello button clicked."
    @glade['message_label'].text = "You clicked me!"
  end
end

# Main program
if __FILE__ == $0
  # Set values as your own application.
  PROG_PATH = "main_view.glade"
  PROG_NAME = "Hello World!"
  MainViewGlade.new(PROG_PATH, nil, PROG_NAME)
  Gtk.main
end

But then, you will surely get a big headache when you need to add more functionality to the application. RuGUI tries to help you by letting you separate your application in well defined layers, each with his own responsabilities. This way its easier to make your application evolve without having maintainence problems.

Getting excited? Try it out now!

Tagged , , ,